Stringing Menu - Click on a Tab |
 |
Join All Codes |
|
Join by Code |
As for Join All, but limiting the points to the code of the first point selected by the User and subsequently selected points with the same code. |
Join Selection |
As for Join All, but limiting the points to those selected by the User. |
Manual Join |
Creates a Stringline and a Breakline (settings for which are based on the first point selected) through the points individually selected. |
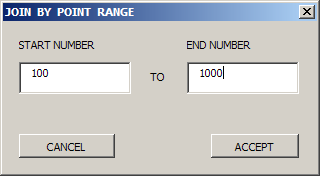
Join Point Number Range
|
As for Join All but allows the user to limit the point by number
range
|
Search and Replace Code
|
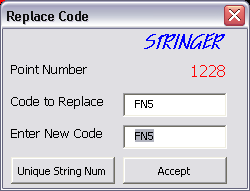
Allows the user to search the project and replace point description codes with a new one for selected points. The user selects a sample point from the screen to set the Code to Replace (can be changed in the form if required) and enters the New Code. The user then select the points to apply the changes to. If you do not select a sample point, the menu is offered with blank fields, allowing manual entry of the Search and Replace codes. If no Search code is entered then all selected points have their entire code changed to the code entered in the New Code field. This is used for globally replacing a selection of points with a new code, irrespective of the points current code.
The button Unique String Num causes the programme to scan the drawing for the next available String Number for this code. This option only appears if the code being search for has a string number. |
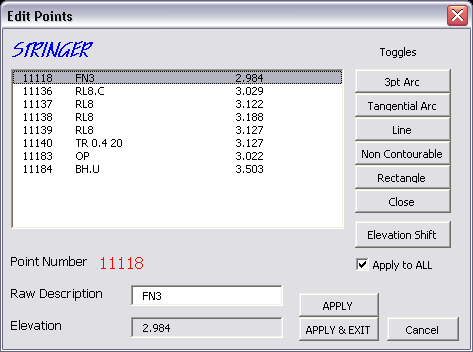
Edit Point Level or Code |
Allows the user to edit the Raw Description, Elevation and add/remove the String Parameters to existing points in the project. To add or remove a String Parameter, simply check or uncheck the box for the appropriate parameter. For example, selecting a coded point EB01.F will open the form Fit 3pt ARC box checked, deselecting the box will remove the .F from the code, leaving just EB01. Refer to String Parameters section below for explanations of these options. Altering the parameters will cause the program to search for effected polylines, erasing the old polylines and reprocessing the code effected. This is referred to as Interactive Editing.
|
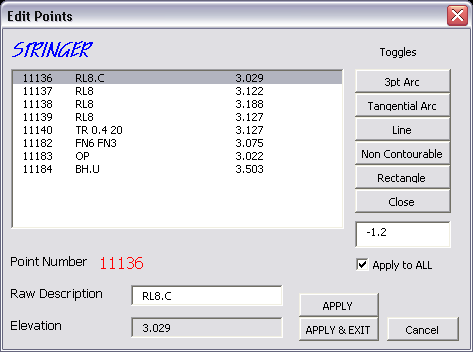
Edit Multiple Point Codes |
Allows the user to edit the Raw Description of Multiple Points, adding or removing the String Parameters. To add or remove a String Parameter, simply check or uncheck the box for the appropriate parameter. For example, clicking on the 3pt Arc button will cause the .F parameter to toggle on or off. If the Apply to All is on, then the selected parameter is applied to all of the selected points. If it is not ticked, then only the currently highlighted point is affected. You can manually alter the codes in the Text Edit box as well. Elevations and Point Numbers can not be altered. Refer to String Parameters section below for explanations of these options.
Altering the parameters will cause the program to search for effected polylines, erasing the old polylines and reprocessing the code effected. This is referred to as Interactive Editing. You must click on the Apply button for the edits to take effect. Pressing Exit does not automatically apply the changes. Elevation Shift Pressing the Elevation Shift button reveals the Elevation Shift entry box. Enter the amount that you wish to alter the current elevations by. Again, the changes are not applied to the drawing until you press Apply, although the elevations in the display will reflect the change. Press the escape key to cancel the elevation shift entry.
|